Ref/express.js!
Featured Article
How to Integrate Your Node/Express Website with Google Authenticator for Two-Factor Authentication in 2022
By AstroMacGuffin dated Sat Aug 20 2022 08:55:37 GMT+0000 (Coordinated Universal Time) last updated Mon Aug 22 2022 22:16:57 GMT+0000 (Coordinated Universal Time) I've been making personal websites off-and-on since the 90's, so one can probably assume I've lost websites to hackers in the past. Once the rootkit is installed on your host and the sketchy ads are in your articles, it's very difficult to get them all out. So security is best handled as a preventative measure, not a reactive one. In this article, I'll walk you through the entire process of integrating with Google Authenticator for 2FA (two-factor authentication). I'll be using MongoDB, Node.js, and Express.js.
If you've seen other articles covering this topic, you may have noticed that they use `speakeasy`, an NPM package that hasn't been updated in 7 years. That's not the best look for a security kit. Thankfully, another author has forked that package and updated it just this year, so we're good to go. Other articles also tend not to cover the front-end, which is crucial to understanding how 2FA is even supposed to work. This article takes you through the entire integration.
### Ingredients
- your existing login system
- the NPM package `express-session`, which you should already be using in your login system
- the NPM package `connect-mongo`, probably
- the NPM package `@levminer/speakeasy`, a fork of `speakeasy`
- the NPM package `qrcode`
- a couple of database methods
- a significant rejiggering of the registration and login processes
### Basic Orientation
Maybe this is your first experience with Two-Factor Authentication (2FA). Let's start slow, and explain things as we go:
#### What Is Two-Factor Authentication?
For those of you not up to speed, 2FA means the login has two prompts: one for username and password, and then another prompt for a separate secret. In theory (and practice for companies in the Forbes 500 list) this can mean thumbprints, retinal scans, heck why not even prick a finger and analyze some DNA... in reality, it means whipping out your phone, looking at Google Authenticator, and punching in a 6-digit code. It's a quick and painless process once you get used to it.
#### What are the Advantages of 2FA?
Two-factor authentication protects users and website owners from weak or stolen passwords, by using decently-strong encryption on a physical key. In this case, the key is a smartphone.
#### What is Google Authenticator?
Google Authenticator is a free smartphone app by Google. It retrieves encryption settings from a website by scanning a QR Code. The QR Code is a very important secret, like a password, except that the QR Code must be unique to each user. Once configured, Google Authenticator then issues 6-digit codes, which are entered as a "second password" for logging into 2FA-enabled sites and apps. The codes spawn and expire based on 30-second timers.
### The Nitty Gritty: NPM Packages Used in 2FA
Aside from the usual suspects, i.e. Express and your chosen database connector library, there are three (or four) NPM packages you'll need for this feature.
#### 2FA Validation & URL Generation by `@levminer/speakeasy`
After 7 years of no updates to the `speakeasy` library, Github user `@levminer` has forked the project, reviving and modernizing it. They've also upgraded the `speakeasy` documentation significantly. This library provides the following things that are relevant to our technique for enabling 2FA:
- creation of a shared secret, needed to synchronize encryption/validation between Google Authenticator and your website
- validation of tokens against the shared secret
- creation of an `otpauth` URL for configuring Google Authenticator
`@levminer/speakeasy` also handles *creation* of time-based tokens, useful to those who send the 6-digit code over SMS texts or some other method instead of Google Authenticator; as well as another token system for one-time passwords. But we'll be using only the above three features.
To install:
```
npm install @levminer/speakeasy
```
[Documentation for @levminer/speakeasy](https://www.npmjs.com/package/@levminer/speakeasy)
#### QR Code Generation by `qrcode`
This one takes very little explaining. My favorite part of `qrcode` is that it can output the code in SVG format. My least favorite part is that the method for creating the QR Code, requires a callback to receive the code. This made things slightly tricky in terms of rendering an Express.js template that included the code. You'll see how I solved that, below. The QR Code we generate will encode the URL created by `@levminer/speakeasy`, which tells Google Authenticator how to generate valid 6-digit codes for your website.
To install:
```
npm install qrcode
```
[Documentation for qrcode](https://www.npmjs.com/package/qrcode)
#### Sessions by `express-session`
A "session" is web tech speak for a server-side variable that links to a client-side cookie. The cookie contains only enough info to identify the session. The session can then be used to store whatever data you want to link to that visitor or account. Is the user logged in? Who as? Is that user an admin? Etc. It's very convenient and reasonably secure, especially compared to the alternative of storing all this data in cookies. The `express-session` package is insanely easy to use; just enable the middleware and you instantly have a working session system with variables automatically populated into `req.session`.
To install:
```
npm install express-session
```
[Documentation for express-session](https://www.npmjs.com/package/express-session)
If you need a quick-start for `express-session`, just put this into your main JS file (the one that you run with `node [filename]`, aka the target of your `npm start` script as found in `package.json`):
```js
const session = require('express-session')({
cookie: { sameSite: false },
secret: 'funky ol gorilla',
});
// use sessions
app.use(session);
```
#### Session Data Storage by `connect-mongo`
But where will the session data be stored if the server restarts? By default, that data would be lost and everyone would be logged out of your website. You need database storage for your session data, to solve this problem, and that's where `connect-mongo` comes in. Again, this library is insanely easy to use. You instantiate an object as part of your initialization for `express-session`, and you're done. It automatically creates a `sessions` collection in your database and keeps it up to date as part of the `express-session` task load.
To install:
```
npm install connect-mongo
```
[Documentation for connect-mongo](https://www.npmjs.com/package/connect-mongo)
If you need a quick-start for `connect-mongo`: remember the code I told you to put into your main JS file above? Modify it like so:
```js
const MongoStore = require('connect-mongo');
const session = require('express-session')({
cookie: { sameSite: false },
secret: 'funky ol gorilla',
store: MongoStore.create({
mongoUrl: `YOUR MONGO CONNECTION STRING`,
}),
});
// use sessions
app.use(session);
```
Be sure to change the `mongoUrl` field to your actual MongoDB connection string, which is made of five fields:
- your MongoDB USERNAME
- your MongoDB PASSWORD
- the HOST the MongoDB server runs on (usually 127.0.0.1)
- the PORT the MongoDB server listens on (usually 27017)
- the DATABASE_NAME relevant to this project
You put them together like the following:
```
mongodb://USERNAME:PASSWORD@HOST:PORT/DATABASE_NAME
```

### Now, Where To Begin?
I felt it necessary to start with a quick reality check, to make sure I understood the documentation correctly. So rather than hacking up my existing code, I created a new Node.js script, and started cherry-picking from the documentation for `@levminer/speakeasy` and `qrcode`. Here's the result:
```js
const speakeasy = require('@levminer/speakeasy');
const QRCode = require('qrcode');
const secret = speakeasy.generateSecret({ length: 32 });
const token = speakeasy.totp({
secret: secret.ascii,
encoding: "ascii",
});
console.log(`token: ${token}`);
const tokenValidates = speakeasy.totp.verify({
secret: secret.base32,
encoding: "base32",
token: token,
window: 2,
});
console.log(tokenValidates);
const url = speakeasy.otpauthURL({
secret: secret.ascii, label: "AstroMacGuffin.com", algorithm: "sha512"
});
console.log(url);
QRCode.toString(url, {type: 'svg'}, (err, qr) => {
console.log(qr);
});
```
Let's break that down:
```js
const speakeasy = require('@levminer/speakeasy');
const QRCode = require('qrcode');
```
Above, I'm just including our two rockstar libraries, as already discussed.
```js
const secret = speakeasy.generateSecret({ length: 32 });
```
This `secret` being created above is used to configure the encryption and validation, so you'll see it being used in every step of the process below.
```js
const token = speakeasy.totp({
secret: secret.ascii,
encoding: "ascii",
});
console.log(`token: ${token}`);
```
I needed a 6-digit code to validate, so I generated one. We *won't* be using the above feature, later in the article: but the above was used temporarily as a substitute for Google Authenticator. I used the `.ascii` version of the `secret` above, and the `.base32` version below, just to verify that it works when you mix-and-match; it does.
```js
const tokenValidates = speakeasy.totp.verify({
secret: secret.base32,
encoding: "base32",
token: token,
window: 2,
});
console.log(tokenValidates);
```
Above, we check whether the `token` validates -- the `token` being our 6-digit code, that is. This is how you'll validate the codes from Google Authenticator, too. The `window` option specifies how old the code can be before it's rejected. Each window is 30 seconds long by default, the same length of time Google Authenticator uses. This length of time is configurable, but we're going to leave it alone for compatibility with Google Authenticator.
```js
const url = speakeasy.otpauthURL({
secret: secret.ascii, label: "AstroMacGuffin.com", algorithm: "sha512"
});
console.log(url);
```
Above, we generate a URL for Google Authenticator or any compatible app. The URL starts with the `otpauth` protocol, and includes the label, the ASCII version of the `secret`, and the algorithm name.
Let's pause for a moment. Let's say you're a person who usually browses the web on a mobile device. Along comes a website that wants you to use two-factor authentication ... which means they want you to scan a QR Code. How are you supposed to do that when the QR Code is being displayed on the same device that has your camera and runs the authenticator app? Are you supposed to point another phone at this phone? One phone for Google Authenticator, another phone for browsing? No. Google Authenticator registers itself as the default handler for `otpauth` links, which means webmasters should be using responsive CSS code to show the QR Code on PC and a plain old link to the `otpauth` URL on mobile.
Finally, about that QR Code:
```js
QRCode.toString(url, {type: 'svg'}, (err, qr) => {
console.log(qr);
});
```
As I said, this method requires a callback to receive the QR Code output. In the above, we output the QR Code as SVG to the console. It works beautifully, but we're going to have to work around it a bit in order to incorporate that output into a template. Be patient, we'll get there.
Now that we've verified that the features all work as expected and that we understand how to use them, it's time to start modifying your project.
### Step 1: Your Own Personal 2FA Library
The first step is to convert the "reality check" code, into code assets for your project. I have a `MiscUtils` class that floats around my project as the object `mu`. Everything that doesn't invoke the database, will go there. So first we put the following at the top of the `MiscUtils` class file:
```js
const speakeasy = require('@levminer/speakeasy');
```
And here are the first methods I put into `MiscUtils`:
```js
makeTOTPSecret() {
return speakeasy.generateSecret({ length: 32 });
}
validateTOTP(totp, secret) {
if (!totp || !secret) return false;
return speakeasy.totp.verify({
secret: secret.base32,
encoding: "base32",
token: totp,
window: 2,
});
}
```
(TOTP stands for "Time-based One-Time Password".)
As you can see, this is a copy-paste of my "reality check" code, with very little modification. Thanks to the `window: 2` option and the default time-step of 30 seconds, we give the user 60 seconds to enter the code; that's plenty of time. These two methods are separated because the secret must be generated at user registration, while the token/TOTP must be validated at login.
This, of course, means we must store the secret in the database. Let's get started on the database code, then. I added these methods to `SiteDatabase`, my object class for database operations:
```js
async setTOTPSecret(secret, username) {
try {
const d = mdb.db("yourDatabaseName");
const t = d.collection("yourUsersCollection");
const query = { username };
const doc = { $set: {
totp_secret: {
base32: secret.base32,
ascii: secret.ascii,
hex: secret.hex,
}
}};
await t.updateOne(query, doc, {upsert: false})
}
catch (e) {
logError(`Error setting TOTP secret: ${e}`);
}
}
async getTOTPSecret(username) {
try {
const d = mdb.db("yourDatabaseName");
const t = d.collection("yourUsersCollection");
const query = {username};
let c = await t.findOne(query);
if (!c.totp_secret) {
const secret = mu.makeTOTPSecret();
await this.setTOTPSecret(secret, username);
return secret;
}
return c.totp_secret;
}
catch (e) {
logError(`Error getting TOTP secret: ${e}`);
}
}
```
Let's break that down.
```js
async setTOTPSecret(secret, username) {
try {
```
Here we define the method signature and open a `try` block. The method needs to be `async` because we'll be `await`-ing some database methods inside.
```js
const d = mdb.db("yourDatabaseName");
```
`mdb` is an instance of `MongoClient`, the main workhorse of the `mongodb` NPM package. Replace `yourDatabaseName` with a recipe for cardboard cake, or your database name. Probably the latter.
```js
const t = d.collection("yourUsersCollection");
```
Replace `yourUsersCollection` with the name of your favorite uncle, or your users collection. Probably the latter.
```js
const query = { username };
```
This is our filter; we only want to update one record, the one with a `username` matching the `username` argument sent to this method.
```js
const doc = { $set: {
totp_secret: {
base32: secret.base32,
ascii: secret.ascii,
hex: secret.hex,
}
}};
```
The above is the data we're updating. The above three object fields, correspond to the three encoding styles available for the `secret`.
```js
await t.updateOne(query, doc, {upsert: false});
```
We don't want an `upsert` (which inserts a new record if there's no match for `query`).
```js
}
catch (e) {
logError(`Error setting TOTP secret: ${e}`);
}
}
```
Above we close out the `try` block, issue our `catch` block, and close out the method. (`logError()` is part of my own logger utilities.)
```js
async getTOTPSecret(username) {
try {
```
Above we start the next method: fetching the secret from the database, for a given `username`.
```js
const d = mdb.db("yourDatabaseName");
const t = d.collection("yourUsersCollection");
const query = {username};
```
Same as in the previous method, we get an instance of the database, then an instance of the collection, and then set a `query` to filter our results down to only the record with a matching `username`.
```js
let c = await t.findOne(query);
```
Above, we do the query and capture the result in `c`.
```js
if (!c.totp_secret) {
const secret = mu.makeTOTPSecret();
await this.setTOTPSecret(secret, username);
return secret;
}
```
If the result doesn't have the `totp_secret` field, we must generate one, save it, and return it. That's what we're doing above.
```js
return c.totp_secret;
```
Otherwise, we return the `totp_secret` from the query result.
```js
}
catch (e) {
logError(`Error getting TOTP secret: ${e}`);
}
}
```
And we close out the `try` block, do the `catch` block, and close out the method.
There's more to do in your personal code library, but we'll come back to that when it's time. Wait for it... okay, it's time.

### Step 2: Modifying the Registration Process for Two-Factor Authentication
It's time to show new users the QR Code they'll need for logging in with 2FA. It's crucial that your users understand there is a mandatory action they must do immediately after registration. They must prepare Google Authenticator for 2FA on this website, or else they will not be able to log in, whether that means now or in the future.
There are roughly three techniques for handling the end of the registration process:
1. The user is automatically logged in
2. The user is redirected to the login page
3. The user is put in an onboarding process
It doesn't matter which you prefer, or which your app currently uses. Mine was redirecting to the login page when I started adding this feature. **No matter what, the user should be shown the QR Code as soon as they complete the most basic registration step** in case they do something wacky like clearing their cookies immediately after registration.
If the user gets up and goes to the bathroom and then forgets to come back, any onboarding process can pick up where it left off. But, if the user can't log in because they didn't set up the necessities for two-factor authentication, you probably won't ever see that user again... or, at best, your database will be full of unused users, plus users who had to sign up a second time, with a secondary email address.
As soon as your website's logic says "yeah, this user should be allowed to log in now", that's when you show them the QR Code and give them instructions on setting up and using 2FA to log in.
#### Handling the User
The anatomy of a registration process is:
- validate & sanitize user inputs
- reject if anything is invalid; return user to registration form and report why
- if the inputs are all valid & sane, add the user to the database
- perhaps log the user in
- redirect to a start page OR display a template that begins an onboarding process
Setting up two-factor authentication is basically an onboarding process, so all roads lead there: if you were redirecting the user, you have to stop doing that and create a template that displays and explains the QR Code. If you were already onboarding the user, you need to bump step 1 down to step 2, and insert a new step 1: preparing for two-factor authentication.
For example, after adding the user to the database, my 2FA post-registration step now does this:
```js
const secret = await db.getTOTPSecret(usernameSafe);
await mu.getTOTPQRCodeAndRenderTemplate(
secret,
res,
'user-adduser',
Object.assign({
title: 'User/User Registered! | AstroMacGuffin.com',
message: 'User/User Registered!',
activeLink: undefined,
}, await db.getDefaultRenderOptionsObj(req)),
usernameSafe,
);
```
There's a lot to unpack here, but mainly:
- we've got a `MiscUtils` method that just appeared out of nowhere! It's the briskly-named `.getTOTPQRCodeAndRenderTemplate()`.
- we've got a `SiteDatabase` method I've never mentioned, `.getDefaultRenderOptionsObj()`.
`.getDefaultRenderOptionsObj()` is simply a method that collects a bunch of data and makes it available to my templates. It saves a lot of work because now my routes don't need logic for a slew of variables and database requests.
Remember I said there was going to be a problem with `QRCode.toString()` because it requires a callback to receive the QR Code? I'm not sure how many solutions there were to this problem, but here's the one I chose. First, we add the following to the top of the `MiscUtils` file:
```js
const QRCode = require('qrcode');
```
And then we add the following method:
```js
async getTOTPQRCodeAndRenderTemplate(secret, res, tpl, obj, username) {
try {
const url = speakeasy.otpauthURL({
secret: secret.ascii,
label: `YourWebsiteName.com (${username})`,
algorithm: "sha512"
});
await QRCode.toString(url, {type: 'svg'}, (err, qr) => {
res.render(tpl, Object.assign(obj, {qr, qrURL: url}));
});
}
catch (e) {
logError(`Can't make QR code: ${e}`);
}
}
```
Let's break that down:
```js
async getTOTPQRCodeAndRenderTemplate(secret, res, tpl, obj, username) {
try {
```
This is an asynchronous method with a long name and a lot of parameters, all of them mandatory.
- `secret` is a TOTP secret, generated by `speakeasy` via our `MiscUtils` helper method.
- `res` is the Express response object. We need this to render the template.
- `tpl` is the name of the template to be rendered.
- `obj` is the data to be passed to the template.
- `username` is the already-sanitized and validated username.
```js
const url = speakeasy.otpauthURL({
secret: secret.ascii,
label: `YourWebsiteName.com (${username})`,
algorithm: "sha512"
});
```
Make sure you replace `YourWebsiteName.com` with your nicest pair of socks. Or, you know. Maybe your website name? The `label` option is what will be displayed in Google Authenticator. It should include the `username` for mainly ***your*** personal convenience, as we all have our admin accounts, our test accounts, and possibly more...
```js
await QRCode.toString(url, {type: 'svg'}, (err, qr) => {
res.render(tpl, Object.assign(obj, {qr, qrURL: url}));
});
```
And the solution to our callback problem. What's this do?
- It uses the `res` object passed into the `.getTOTPQRCodeAndRenderTemplate()` method, to render a template.
- Which template? `tpl`, as passed into the `.getTOTPQRCodeAndRenderTemplate()` method.
- The `obj` (template data passed into the method) is merged with new data using `Object.assign()`.
- The new data contains both the QR code (`qr`) and the URL embedded in the picture (`qrURL`).
```js
}
catch (e) {
logError(`Can't make QR code: ${e}`);
}
}
```
End the `try` block, do the `catch` block, and end the method.
Now your post-registration template just needs to be modified. Out with the redirect (if there was one) and in with the QR Code and an explanation of it and of 2FA.
Here's a tip for you Pug users: If you output the SVG QR Code the wrong way, it will display a bunch of SVG code on your output (i.e. it will display the code on your website) rather than actually using the SVG as source. Here's how to do it:
```
div !{qr}
```
And here's another tip for everyone: you can use CSS classes as conditional logic for your responsive code. That's how my post-registration page knows whether to show the QR Code, or just the link:
```css
/* desktop */
.if-mobile {
display: none;
}
.if-not-mobile {
display: block;
}
@media (max-width: 1024px) {
/* mobile */
.if-mobile {
display: block;
}
.if-not-mobile {
display: none;
}
}
```
Here's the relevant part of my Pug template, which should be self-explanatory:
```
h1= message
p Hang tight, we just need to go over 2 things:
h2 Two-Factor Authentication Required
div.if-not-mobile#qr(style="margin: 2.5vw auto; width: 25vw; align: center;") !{qr}
p.
<strong>Action required! Don't leave this page until done!</strong>
It's simple. Download the free Google Authenticator app on your
smartphone or similar device. Launch it. Click the plus-sign button
on the bottom-right, and choose to scan a QR code. Scan the code
above. That's the setup; you'll only do those steps once.
p.if-mobile
strong.
If you don't see a QR code above, click this link instead:
a(href=`${qrURL}`).
You must have Google Authenticator (or a similar app) installed on
this device.
p.
Then, each time you log in to AstroMacGuffin.com, launch
Google Authenticator and enter the 6-digit code.
```
### Step 3: Modifying the Login Process for Two-Factor Authentication
We're almost done! Now all that's left is to prompt for, and verify, the 6-digit code.
It's up to you whether to make a 3-field login form (username/password/2FA) or a 2-step login form (username and password on the first step, 2FA on the second step). I went with two steps.
The anatomy of a login without 2FA:
- sanitize the username and password inputs
- check the username and password against the database
- if either of the two steps above fails, return the user to the login form with feedback
- otherwise, log the user in and set whatever session variables
- redirect the user to some start page
We need to modify that. We'll be bumping the redirect to later, inserting another step before that redirect.
Let's say, for example, that your Express.js routes are set up like this:
- `/user/login` points at the login page
- `/user/dologin` processes the login form once submitted
And your Pug templates, like this:
- `user-login.pug` is the page with the login form.
- `user-dologin.pug` is shown after successful login; it redirects the user to the home page after 3 seconds.
After we're done:
- The Express.js route `/user/login` and Pug template `user-login.pug` will not be modified.
- The route `/user/dologin` will instead serve the new template `user-2faform.pug` after successful username/password login.
- `/user/do2fa` will be a new route which serves `user-dologin.pug` on successful 2FA login.
**But first let's talk about session variables.** The `/user/dologin` route was previously in charge of setting session variables that indicate to the system that the user is logged in. We still need the data from those variables, but we don't want them to be stored with the same configuration as they are in the unmodified form. I recommend simply moving them to a `req.session.login` object -- all the same variables, but without the side-effect of accidentally treating your users as if they're logged in, before they complete two-factor authentication.
`user-2faform.pug` is a whole page template containing a simple `form` with one `input type="text"` plus a submit button. It doesn't get much easier. The `action` of the `form` is, of course, `/user/do2fa`. We'll name the `input` field `twofactor`.
The `/user/do2fa` route is surprisingly simple:
```js
router.post('/do2fa', async (req, res) => {
if (!req.session.login || !req.session.login.username)
return res.redirect('/user/login');
const secret = await db.getTOTPSecret(req.session.login.username);
const valid2fa = mu.validateTOTP(req.body.twofactor, secret);
if (!valid2fa) {
try {
return res.render('user-2faform', Object.assign({
title: '2-Factor Authentication Failed. Try again!',
message: '2-Factor Authentication Failed. Try again!',
activeLink: undefined,
}, await db.getDefaultRenderOptionsObj(req)));
}
catch (e) { logError(e); return; }
}
req.session.username = req.session.login.username;
delete req.session.login;
res.render('user-dologin', Object.assign({
title: 'User/Login Successful!',
message: 'User/Login Successful!',
activeLink: undefined,
}, await db.getDefaultRenderOptionsObj(req)));
});
```
Let's break that down:
```js
router.post('/do2fa', async (req, res) => {
if (!req.session.login || !req.session.login.username)
res.redirect('/user/login');
```
This is a `post` route. If we haven't signified that the user has succeeded at the username/password login yet -- by setting their username in `req.session.login.username` -- then we kick them back to that login form.
```js
const secret = await db.getTOTPSecret(req.session.login.username);
const valid2fa = mu.validateTOTP(req.body.twofactor, secret);
```
Above we fetch the user's TOTP secret from the database, and then validate their input with our wrapper function. My `username` is sanitized before storage in the session; be sure you are sanitizing it at some point before it finds its way to `db.getTOTPSecret()`, since that method puts the `username` in a database query.
```js
if (!valid2fa) {
try {
return res.render('user-2faform', Object.assign({
title: '2-Factor Authentication Failed. Try again!',
message: '2-Factor Authentication Failed. Try again!',
activeLink: undefined,
}, await db.getDefaultRenderOptionsObj(req)));
}
catch (e) { logError(e); return }
}
```
As shown above, if the 2FA 6-digit code wasn't valid, we kick the user back to the `user-2faform.pug` template with a message that they should try again. We `return` the call to `res.render()` (and return in the `catch` block for extra security) so that users with invalid logins, won't experience the code below:
```js
req.session.username = req.session.login.username;
delete req.session.login;
```
*Now* we can log the user in. Remember when I talked about session variables that signify to your system that the user is logged in? We need to move those out of their temporary holding cell and into their normal configuration. And thus, the user is logged in.
```js
res.render('user-dologin', Object.assign({
title: 'User/Login Successful!',
message: 'User/Login Successful!',
activeLink: undefined,
}, await db.getDefaultRenderOptionsObj(req)));
});
```
Now we can serve the template that redirects users to a start page post-login. We do that simply by serving the same template that was originally served for successful username/password logins before 2FA was integrated.
### Conclusion
Two-factor authentication only works if it's done correctly. My first implementation had a single site-wide secret that was shown on the login page. If I hadn't thought about the fact that this broadcasts the only layer of security involved in 2FA to everyone interested, it would have stayed that way. (With thanks to a friend who confirmed my suspicions that I had done it wrong, and shared what they knew.)
On that note, I should point out that I am not terribly well-versed in security matters. The information provided in this article comes as-is with no claims of usability for any purpose. If you follow this tutorial, I am not responsible for any results. Sorry, had to get a little bit of legal-ese out of my system.
Now the only thing left is to decide whether all logins require 2FA, or whether to make it optional? It depends on how disaster-proof your website is. The higher your risk after security has been penetrated, the more security you need. I went with mandatory 2FA for all logins because I don't like disaster recovery at all. I don't like disasters. At all. The minor speed bump of using two-factor authentication to log into my own website is nothing compared to the multi-day, sometimes weeks-long ordeal of recovering from a hack.
Featured Article
How to Code a Simple Media Manager & File Uploader for a Node/Express Site in 2022
By AstroMacGuffin dated Wed Jul 27 2022 22:06:06 GMT+0000 (Coordinated Universal Time) last updated Sat Sep 03 2022 22:39:09 GMT+0000 (Coordinated Universal Time)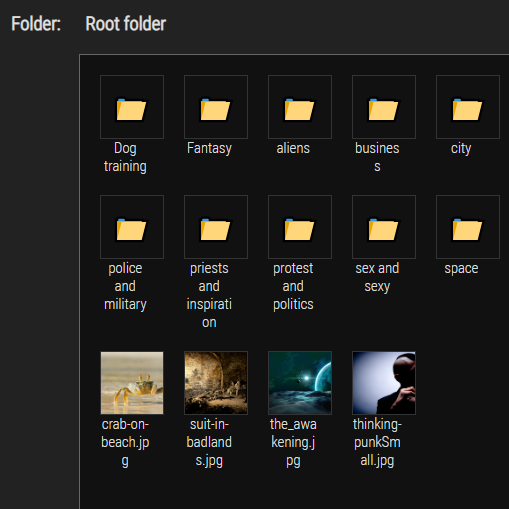 The first thing you need to know about this media manager is that it's not a good idea to expose it to normal users. They'll be able to create folders, and the filename screening isn't good enough to trust the inputs from random people.
But if you need a way to get Markdown-formatted image tags easily from the images on your website, or just a working version of Express.js file uploads in 2022, as I did, this lesson will get you there. And if you need a springboard you can bring your own improvements to, as I've done since this article was first pushed... I enjoy working with it. I hope you will too.
### Ingredients
- a simple `MediaManager` object on the server side, to handle utilities such as setting/getting path names, creating folders, and getting lists of folders and files in a given subfolder
- a POST route in your Express.js app for handling all MediaManager requests (which will all be AJAX, via jQuery)
- middleware that acts on your route - in the form of an NPM package, called `multer`
- a pug template for the media manager interface
- some extra pug code in whatever interfaces where you want to enable the media manager
- jQuery and a plugin for jQuery, called jquery-uploadfile, which takes a ton of sweat out of the process and gives you a great UI experience including progress bars and options for multiple file uploads and drag 'n drop
- about 145 lines of CSS code
- a client-side JavaScript file to set up the media manager's interface buttons and so forth
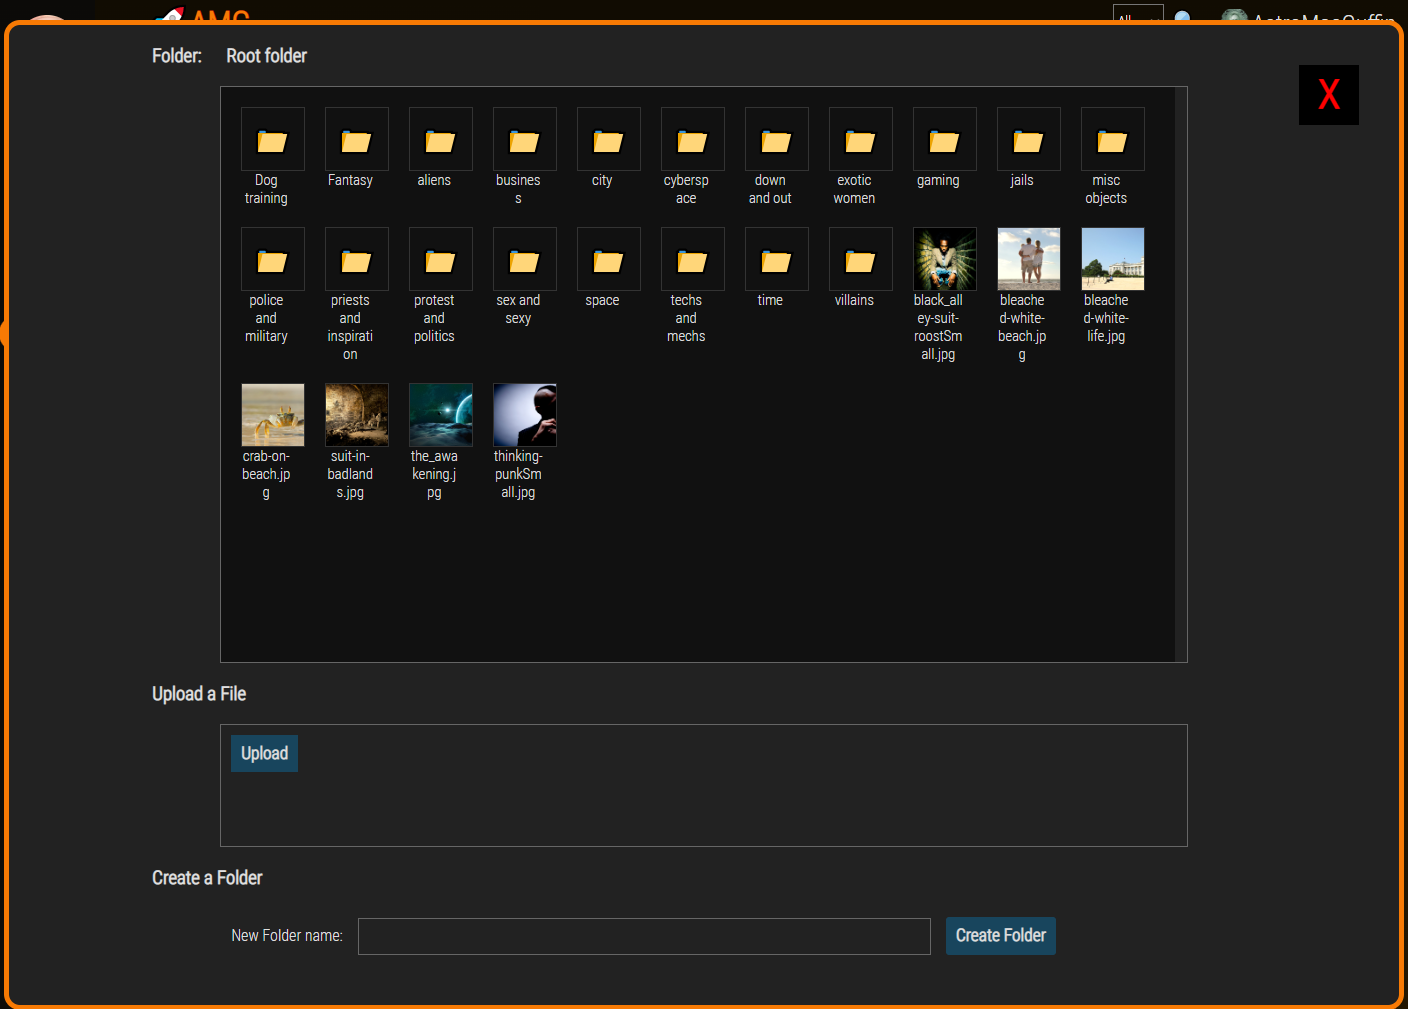
### What This Media Manager Does
It's basically a file browser. You can navigate folders, and when you find the image you want, you click it; it then copies Markdown code to your clipboard which you can paste into an input or (more likely) a textarea.
It handles file uploads. The files will be uploaded to the folder you're viewing. It also creates new folders.
### What This Media Manager Doesn't Do
It can't delete files. I decided that, since this is a tool only for admins, and I'm going to be the only admin of this site for the foreseeable future, I can delete files another way.
### On To The Code! First Up: The Server Side Object
This is `media-manager.js`, a Node object:
```js
const path = require('path');
const fs = require('fs');
class MediaManager {
constructor(pathName=global.config.media_path) {
if (pathName.indexOf('..') === -1 && pathName.search(/^\//) === -1)
this.basePath = path.join(__dirname, pathName);
else
this.basePath = path.join(__dirname, global.config.media_path);
this.subPath = '';
}
setSubPath(pathName) {
if (pathName.indexOf('..') > -1 || pathName.search(/^\//) > -1)
return false;
this.subPath = pathName;
return true;
}
getPath() {
return path.join(__dirname, global.config.media_path, this.subPath);
}
createFolder(pathName) {
if (pathName.indexOf('..') > -1 || pathName.search(/^\//) > -1)
return false;
let fullPath = path.join(this.basePath, this.subPath, pathName);
let r = fs.mkdirSync(fullPath, { recursive: true });
if (r === undefined) return false;
return true;
}
getFolders() {
let pathName = path.join(this.basePath, this.subPath);
return fs.readdirSync(pathName, { withFileTypes: true })
.filter(f => f.isDirectory())
.map(f => f.name)
}
getFiles() {
let pathName = path.join(this.basePath, this.subPath);
return fs.readdirSync(pathName, { withFileTypes: true })
.filter(f => !f.isDirectory())
.map(f => f.name)
}
}
module.exports = MediaManager;
```
Let's break that down:
```js
const path = require('path');
const fs = require('fs');
```
We'll be merging paths and doing disk operations, so we need the above packages.
```js
class MediaManager {
constructor(pathName=global.config.media_path) {
if (pathName.indexOf('..') === -1 && pathName.search(/^\//) === -1)
this.basePath = path.join(__dirname, pathName);
else
this.basePath = path.join(__dirname, global.config.media_path);
this.subPath = '';
}
```
The `pathName` argument for the constructor is optional; my code has a `global.config` object with a `media_path` property which is a relative path from the website's root folder (where the app script resides). The above code does some basic security steps, making sure the input doesn't attempt to go to the parent directory or start at the root directory.
```js
setSubPath(pathName) {
if (pathName.indexOf('..') > -1 || pathName.search(/^\//) > -1)
return false;
this.subPath = pathName;
return true;
}
```
With the same security steps as the constructor, the `setSubPath()` method, shown above, stores a property so that it can be merged later with the `basePath` property and `__dirname` (this file is in the project root folder, so `__dirname` will return that folder). This is how we 'select' a path with the object.
```js
getPath() {
return path.join(__dirname, global.config.media_path, this.subPath);
}
```
The above is a utility function that gets me the full, absolute path to the currently selected subfolder.
```js
createFolder(pathName) {
if (pathName.indexOf('..') > -1 || pathName.search(/^\//) > -1)
return false;
let fullPath = path.join(this.basePath, this.subPath, pathName);
let r = fs.mkdirSync(fullPath);
if (r === undefined) return false;
return true;
}
```
Again the same security steps. We then create a folder, returning `true` on success and `false` on failure.
```js
getFolders() {
let pathName = path.join(this.basePath, this.subPath);
return fs.readdirSync(pathName, { withFileTypes: true })
.filter(f => f.isDirectory())
.map(f => f.name)
}
```
The above method, `getFolders()`, returns an array of folder names found in the current path selected by the object.
```js
getFiles() {
let pathName = path.join(this.basePath, this.subPath);
return fs.readdirSync(pathName, { withFileTypes: true })
.filter(f => !f.isDirectory())
.map(f => f.name)
}
```
The `getFiles()` method is the same as `getFolders()` (actually identical except for an exclamation mark), but it returns an array of files in the selected folder.
```js
}
module.exports = MediaManager;
```
We end the class and export it.
### Next: multer and the POST Route
First, you need to install `multer` using this command in the terminal:
```
npm install multer
```
Then you need a route that takes advantage of that feature. At the top of the router file (or the top of your main app file, if you aren't using router files), you'll need this:
```js
const multer = require('multer');
const upload = multer({ dest: global.config.media_path });
const MediaManager = require('../media-manager');
```
Note above that my `media-manager.js` file is in the parent directory compared to where my router files sit. Your project structure may be different.
Now we get into the actual route that handles all operations from the media manager:
```js
router.post(
'/media-manager',
upload.single('uploadedFile'),
async (req, res) => {
if (req.session.isAdmin === undefined || !req.session.isAdmin) {
return res.redirect('/user');
}
let m = new MediaManager();
let arg = (req.method === 'POST') ? req.body : req.params;
let r = {};
switch (arg.cmd) {
case 'showDir':
if (m.setSubPath(arg.subPath)) {
r = {
folders: m.getFolders(),
files: m.getFiles(),
}
}
else {
r = { status: false }
}
break;
case 'upload':
r = {};
if (req.file === undefined) {
r = { status: false };
}
else if (!m.setSubPath(arg.subPath)) {
r = { status: false };
}
else {
let file = req.file;
let oldPath = path.join(__dirname, '..', file.path);
let newPath = path.join(m.getPath(), file.originalname);
fs.renameSync(oldPath, newPath, (err) => {
if (err) r = { status: false };
else r = { status: true };
});
}
break;
case 'mkDir':
if (m.setSubPath(arg.subPath) && m.createFolder(arg.newFolder)) {
r = { status: true };
}
else {
r = { status: false };
}
break;
}
res.json(r);
}
);
```
Let's break that down:
```js
router.post(
'/media-manager',
upload.single('uploadedFile'),
async (req, res) => {
```
The above says: if a POST request is made to the `/media-manager` URL, invoke the `upload` middleware to allow a single upload; we're expecting our file to have the form element name `uploadedFile`. And of course, we create a callback function to handle this route.
```js
if (req.session.isAdmin === undefined || !req.session.isAdmin) {
return res.redirect('/user');
}
```
If the user isn't an admin, we redirect them to the login/register page, even if they're already logged in. It strikes me as a good hint ;)
```js
let m = new MediaManager();
```
We create a new MediaManager object called `m`.
```js
let arg = (req.method === 'POST') ? req.body : req.params;
```
Originally this was a `.all` route so I wasn't sure which source the form fields would be found in, `req.body` or `req.params`. The above handles that, moving the form body variables into the `arg` variable.
```js
let r = {};
```
The variable `r` will be our return value.
```js
switch (arg.cmd) {
```
As I said, every action the media manager is capable of, will be handled by this one route. The `arg.cmd` form field (a hidden field, or in some cases just a JavaScript object on the browser side) tells us what operation we're being asked to perform on the server side.
```js
case 'showDir':
if (m.setSubPath(arg.subPath)) {
r = {
folders: m.getFolders(),
files: m.getFiles(),
}
}
else {
r = { status: false }
}
break;
```
If the value of `arg.cmd` is equal to `"showDir"` then we do this code. The `MediaManager` object, `m`, has three methods we're using here. The `m.setSubPath()` method selects which subfolder the user wants to see. (If `arg.subPath` is an empty string, `MediaManager` just stays in the folder it was configured to treat as the root folder.) Then we pack `r`, our return value, with a `folders` field populated by `m.getFolders()` and a `files` field populated by `m.getFiles()`. If for any reason `m.setSubPath()` returns false -- namely security reasons -- then instead the return value becomes an object containing only `status: false`.
```js
case 'upload':
r = {};
if (req.file === undefined) {
r = { status: false };
}
else if (!m.setSubPath(arg.subPath)) {
r = { status: false };
}
else {
let file = req.file;
let oldPath = path.join(__dirname, '..', file.path);
let newPath = path.join(m.getPath(), file.originalname);
fs.renameSync(oldPath, newPath, (err) => {
if (err) r = { status: false };
else r = { status: true };
});
}
break;
```
Thank goodness for that middleware, `multer`. Thanks to it, `req.file` contains our uploaded file data. (Multer can also handle multiple file uploads at once, in which case `req.files` would instead be an array of files rather than `req.file` being a file -- but let's keep it simple for now.) Above, we do two screening steps: if `req.file` is undefined or if we can't select the desired subfolder with `m.setSubPath()` then we set our return value to `{status:false}` and move along home.
But if both of those checks pass, we reach the `else` statement, above, which handles the actual upload. We compose the `oldPath` and `newPath` variables, and use `fs.renameSync()` to move the file from its default location to our desired destination. Notice that, since this router file is in a subfolder of my main project folder, I had to put `'..'` into the `path.join()` call after `__dirname` (which returns the absolute path to the directory where the current file is found). Our return value, `r`, is given a `status` field depending on the success or failure of the `fs.renameSync()` call, and we're done with the file upload process.
```js
case 'mkDir':
if (m.setSubPath(arg.subPath) && m.createFolder(arg.newFolder)) {
r = { status: true };
}
else {
r = { status: false };
}
break;
```
Thanks to my node object `m` (an instance of the `MediaManager` class) the command to make a folder is very simple. Both `m.setSubPath()` and `m.createFolder()` return true or false depending on success, so we can do them both in the `if` statement, connected with `&&` (meaning "logical and", i.e. "if both of these conditions evaluate to `true`"). The functions happen regardless of whether they evaluate to `true` or `false`, except that the 2nd function call (`m.createFolder()`) won't happen if the first one (`m.setSubPath()`) returns false -- a feature called short circuiting.
Oh, and in case you missed it during all that jargon: we've created the folder. If both those functions return true, we set the return value `r` to `{status:true}` and move along home.
```js
}
res.json(r);
}
);
```
This concludes the `switch` and the route handler. We send `r` to the browser with JSON response headers and we're done.
### The Pug Template
This part is easy and requires no explanation if you've used Pug before. Here is `mm.pug` in my `views` folder:
```
div#media_manager
span#close_x X
h3 Folder:
span#folderNameDisplay
div#folder_list
- // populated on client-side
h3 Upload a File
div#upload_form(enctype="multipart/form-data")
#fileuploader Upload
input#subPath(type="hidden", name="subPath", value="")
input#cmd(type="hidden", name="cmd", value="upload")
h3 Create a Folder
form#create_folder
label(for="newFolder") New Folder name:
input#new_folder_name(type="text", name="newFolder", value="")
input#new_folder_submit(type="button", name="submit", value="Create Folder")
```
Of course, the CSS and browser-side JavaScript will be referencing those classes and ID's, so be thorough if you decide to change any of them.
### Pug Code Wherever You Need the Media Manager to Appear
There are two insertions to make in whatever Pug template you want to add the media manager to: a button to make the media manager appear, and an include to invoke the media manager's template.
The button code:
```
div.content_buttons
span.open_mm 🖼️ Media Manager
span.copy_msg Markdown img copied. Now paste it into the content below.
```
The inclusion code:
```
if isAdmin
include mm
script(src="/static/media-manager.js")
```
Every route on my app sends the `isAdmin` variable to the template. Make adjustments for whatever security measure you're using. Also remember indentation is key with Pug templates, so don't blindly assume my indentations in the two snippets above will make sense for your template.
### jQuery and jQuery-uploadfile
In addition to jQuery I'm also using jQuery-UI. Here is the Pug code to include the lot, assuming you have downloaded the packages to your `static` folder:
```
script(src="/static/jquery-ui/external/jquery/jquery.js")
link(rel="stylesheet", href="/static/jquery-ui/jquery-ui.structure.min.css", type="text/css")
link(rel="stylesheet", href="/static/jquery-ui/jquery-ui.min.css", type="text/css")
link(rel="stylesheet", href="/static/jquery-ui/jquery-ui.theme.min.css", type="text/css")
script(src="/static/jquery-ui/jquery-ui.min.js")
script(src="/static/jquery.uploadfile.min.js")
```
### The CSS
I'm not prepared to teach you CSS today; I'll just include the CSS code you need, and encourage you to search W3Schools for the things you're unfamiliar with. Learning how to code is superior to copy-pasting blindly.
```css
/* Media Manager ************************************************************ */
#media_manager {
height: 97vh;
width: 97vw;
position: fixed;
top: 1.5vw;
left: .5vh;
z-index: 4;
background-color: #222;
display: none;
border-radius: 1em;
border: 5px solid #f77a04;
box-sizing: content-box;
}
#media_manager h3 {
margin-left: 10vw;
}
#folderNameDisplay {
margin-left: 25px;
}
.open_mm, #close_x {
cursor: pointer;
}
#media_manager #close_x {
position: absolute;
color: red;
background-color: black;
right: 1em;
top: 1em;
width: 50px;
height: 50px;
font-size: 40px;
font-weight: bold;
padding: 5px;
text-align: center;
}
#media_manager #close_x:hover {
background: red;
color: black;
}
#media_manager #folder_list {
width: 66vw;
height: 55vh;
margin: auto;
padding: 10px;
background-color: #111;
color: #dcdcdc;
border: 1px solid #666;
overflow-y: scroll;
}
#media_manager #folder_list::-webkit-scrollbar,
#media_manager #upload_form::-webkit-scrollbar {
width: 12px; /* width of the entire scrollbar */
}
#media_manager #folder_list::-webkit-scrollbar-track,
#media_manager #upload_form::-webkit-scrollbar-track {
background: #222; /* color of the tracking area */
}
#media_manager #folder_list::-webkit-scrollbar-thumb,
#media_manager #upload_form::-webkit-scrollbar-thumb {
background-color: #444; /* color of the scroll thumb */
border-radius: 20px; /* roundness of the scroll thumb */
border: 3px solid #444; /* creates padding around scroll thumb */
}
#media_manager #upload_form {
width: 66vw;
height: 10vh;
margin: auto;
padding: 10px;
border: 1px solid #666;
}
#media_manager #create_folder {
width: 66vw;
padding: 10px;
margin: auto;
}
.mm_icon_form {
display: inline-block;
vertical-align: top;
margin: 10px 10px;
}
.mm_icon_image {
width: 64px;
height: 64px;
background-color: transparent;
border: 1px solid #333;
font-size: 2em;
}
.mm_icon_form > p {
width: 50px;
font-size: 11pt;
vertical-align: top;
text-align: center;
margin: 0 0;
word-wrap: break-word;
}
.copy_msg {
margin-left: 10px;
display: none;
font-weight: bold;
}
#upload_form {
overflow-y: scroll;
}
#fileuploader {
float: left;
display: inline-block;
}
.ajax-file-upload-statusbar {
border: none;
}
#new_folder_name {
background-color: transparent;
color: #dcdcdc;
padding: 10px;
border: 1px solid #666;
width: 40vw;
margin: auto 15px;
}
#new_folder_submit {
border-radius: 3px;
border: 0px solid white;
}
#upload_form #fileuploader .ajax-file-upload, #new_folder_submit {
color: #dcdcdc;
background-color: rgb(24, 69, 93);
font-family: 'Roboto Condensed';
font-size: 13pt;
padding: 10px;
font-weight: bold;
line-height: 13pt !important;
height: auto;
cursor: pointer;
}
#upload_form #fileuploader .ajax-file-upload form input[type="file"] {
height: 100%;
}
.ajax-file-upload-container {
margin-top: 0;
}
.ajax-file-upload-statusbar {
margin-top: 0;
padding-top: 0;
}
```
### Finally, the Browser-Side JavaScript
```js
var dirContents = {};
function renderFolderContents() {
let folders = files = [];
$('#folder_list').html('');
if (dirContents.folders) folders = dirContents.folders;
if (dirContents.files) files = dirContents.files;
// if subfolder exists make ".." link
let subPath = $('#subPath').val();
let backPath = '';
if (subPath !== '') {
let subArray = subPath.split('/');
if (subArray.length > 1) {
backPath = subArray.splice(subArray.length-1).join('/');
}
let f = document.createElement('form');
f.className = 'mm_icon_form';
let i = document.createElement('input');
i.className = 'mm_icon_image';
i.style.cursor = "pointer";
i.setAttribute('type', 'submit');
i.setAttribute('name', 'back');
i.setAttribute('value', '⬅️');
i.setAttribute('id', '..');
f.appendChild(i);
let p = document.createElement('p');
p.innerHTML = 'Go back';
f.appendChild(p);
$('#folder_list').append(f);
document.getElementById('..').addEventListener('click', (e) => {
console.log(e.target.id);
$('#folderNameDisplay').html(
(backPath === '') ? 'Root folder' : backPath
);
$('#subPath').val(backPath);
$.post(
'/media-manager',
{
cmd: 'showDir',
subPath: $('#subPath').val(),
},
(data) => {
console.log(data);
},
'json'
).done((data) => {
dirContents = data;
renderFolderContents();
}).fail(() => {
})
.always(() => {
});
e.preventDefault();
});
}
folders.forEach((item) => {
let f = document.createElement('form');
f.className = 'mm_icon_form';
let i = document.createElement('input');
i.className = 'mm_icon_image';
i.style.cursor = "pointer";
i.setAttribute('type', 'submit');
i.setAttribute('name', item);
i.setAttribute('value', '📁');
i.setAttribute('id', item);
f.appendChild(i);
let p = document.createElement('p');
p.innerHTML = item;
f.appendChild(p);
$('#folder_list').append(f);
document.getElementById(item).addEventListener('click', (e) => {
console.log(e.target.id);
let val = (subPath !== '')
? `${subPath}/${e.target.id}`
: e.target.id;
$('#folderNameDisplay').html(val);
$('#subPath').val(val);
$.post(
'/media-manager',
{
cmd: 'showDir',
subPath: $('#subPath').val(),
},
(data) => {
console.log(data);
},
'json'
).done((data) => {
dirContents = data;
renderFolderContents();
}).fail(() => {
})
.always(() => {
});
e.preventDefault();
})
});
files.forEach((item) => {
let f = document.createElement('form');
f.className = 'mm_icon_form';
let i = document.createElement('input');
i.className = 'mm_icon_image';
i.style.cursor = "pointer";
i.setAttribute('type', 'submit');
i.setAttribute('value', '');
let sub = ($('#subPath').val()) ? `${$('#subPath').val()}/` : '';
let url = `/static/img/mm/${sub}${item}`;
i.setAttribute('id', item);
i.style.backgroundImage = `url('${url}')`;
i.style.backgroundSize = 'cover';
f.appendChild(i);
let p = document.createElement('p');
p.innerHTML = item;
f.appendChild(p);
$('#folder_list').append(f);
document.getElementById(item).addEventListener('click', (e) => {
console.log(e.target.id);
navigator.clipboard.writeText(
``
);
$('#media_manager').fadeOut(150);
$('.copy_msg').fadeIn(1000).fadeOut(5000);
e.preventDefault();
})
});
}
$(document).ready(async () => {
// Media manager always starts at the root folder
$('#folderNameDisplay').html('Root folder');
// initialize jquery-uploadfile plugin
$("#fileuploader").uploadFile({
url: "/media-manager",
fileName: 'uploadedFile',
multiple: false,
dragDrop: false,
dynamicFormData: () => {
return { cmd: $('#cmd').val(), subPath: $('#subPath').val(), };
},
returnType: 'json',
onSuccess: (files,data,xhr,pd) => {
console.log(JSON.stringify(data));
$.post(
`/media-manager`,
{ cmd: 'showDir', subPath: $('#subPath').val() },
(data) => {
console.log(data);
},
'json'
).done((data) => {
dirContents = data;
renderFolderContents();
})
.fail(() => {
})
.always(() => {
});
},
});
// setup create folder button
document.getElementById('create_folder')
.addEventListener('submit', (e) => {
let newFolder = $('#new_folder_name').val();
if (
newFolder === ''
|| newFolder.indexOf('/') > -1
|| newFolder.indexOf('\\') > -1
) return false;
$.post(
`/media-manager`,
{
cmd: 'mkDir', subPath: $('#subPath').val(),
newFolder: newFolder,
},
(data) => {
console.log(data);
},
'json'
).done((data) => {
console.log(data);
$.post(
`/media-manager`,
{ cmd: 'showDir', subPath: $('#subPath').val() },
(data) => {
console.log(data);
},
'json'
).done((data) => {
dirContents = data;
renderFolderContents();
})
.fail(() => {
})
.always(() => {
});
})
.fail(() => {
})
.always(() => {
});
e.preventDefault();
});
// get initial folder data
$.post(
`/media-manager`,
{ cmd: 'showDir', subPath: $('#subPath').val() },
(data) => {
console.log(data);
},
'json'
).done((data) => {
dirContents = data;
renderFolderContents();
})
.fail(() => {
})
.always(() => {
});
$('#close_x').click(() => {
$('#media_manager').fadeOut(150);
});
$('.open_mm').click(() => {
$('#media_manager').fadeIn(150);
});
});
```
You may notice some blank space and think to yourself, that's unlike Astro. Most of it is blanks you can fill in with error-trapping code and other trigger code. I felt I'd be remiss if I removed them, since you might not know the jQuery API supports easily chaining all those options off a single AJAX call.
Let's break it down:
```js
var dirContents = {};
```
Every time we make an AJAX call to refresh the contents of a folder, that data goes in `dirContents` before we call `renderFolderContents()`.
```js
function renderFolderContents() {
```
This is a fairly long function, but also fairly simple.
```js
let folders = files = [];
```
Initialize two variables we'll be looping through later.
```js
$('#folder_list').html('');
```
The above resets the contents of the HTML/DOM element with the id `folder_list`, to blank.
```js
if (dirContents.folders) folders = dirContents.folders;
if (dirContents.files) files = dirContents.files;
```
The `dirContents` object should contain a `folders` field and a `files` field before we hit this function. We're really just making shortcut variables here.
```js
// if we're in a subfolder, make ".." link
let subPath = $('#subPath').val();
let backPath = '';
if (subPath !== '') {
let subArray = subPath.split('/');
if (subArray.length > 1) {
backPath = subArray.splice(subArray.length-1).join('/');
}
```
If we're in a subfolder, we need the ability to navigate to the parent folder. The above is prep work for that UI element. If the `subPath` variable is not an empty string, then we create a temporary array by splitting `subPath` with the forward slash as a delimiter. If that array has more than one element, we `splice` off the last element and then rejoin them using forward slashes, to create the new value of the `backPath` variable.
```js
let f = document.createElement('form');
f.className = 'mm_icon_form';
let i = document.createElement('input');
i.className = 'mm_icon_image';
i.style.cursor = "pointer";
i.setAttribute('type', 'submit');
i.setAttribute('name', 'back');
i.setAttribute('value', '⬅️');
i.setAttribute('id', '..');
f.appendChild(i);
let p = document.createElement('p');
p.innerHTML = 'Go back';
f.appendChild(p);
$('#folder_list').append(f);
```
The above looks like a lot because it's so many lines of code, but really we're just creating and customizing HTML/DOM elements and strapping them on the existing web page. We make a `form`, with an `input type="button"` inside, and a `p` below that.
```js
document.getElementById('..').addEventListener('click', (e) => {
console.log(e.target.id);
$('#folderNameDisplay').html(
(backPath === '') ? 'Root folder' : backPath
);
$('#subPath').val(backPath);
```
This is our click listener for the back button. We conditionally set the `innerHTML` of the element with ID `folderNameDisplay` to either the backPath (if it's not an empty string), or the words 'Root folder' if `backPath` was an empty string. We also set the value of an `input type="hidden"` element with ID `subPath` where we keep track of the currently-viewed folder. Now comes the actual AJAX call:
```js
$.post(
'/media-manager',
{
cmd: 'showDir',
subPath: $('#subPath').val(),
},
(data) => {
console.log(data);
},
'json'
).done((data) => {
dirContents = data;
renderFolderContents();
}).fail(() => {
})
.always(() => {
});
e.preventDefault();
});
```
The above executes our AJAX call to show us the updated contents of the folder. The first argument to `$.post()` is the URL, the second argument is the data we need to send to that URL, the third argument is a success function, and the fourth argument notifies jQuery that we expect the response to be JSON data. After that I left blanks for error handling (the `.fail()` trigger) and an after-process trigger that will always happen (the `.always()` trigger). Finally: because this is AJAX; because the back button is a submit button; and because we don't want the page to refresh when you click it, we use `e.preventDefault()` to prevent the form from submitting the old-fashioned way.
```js
}
```
We're done with the `if` statement, `if (subPath !== '')`.
```js
folders.forEach((item) => {
```
It's time to loop through the `folders` array and render each folder. If you paid attention above, most of the below should look familiar.
```js
let f = document.createElement('form');
f.className = 'mm_icon_form';
let i = document.createElement('input');
i.className = 'mm_icon_image';
i.style.cursor = "pointer";
i.setAttribute('type', 'submit');
i.setAttribute('name', item);
i.setAttribute('value', '📁');
i.setAttribute('id', item);
f.appendChild(i);
let p = document.createElement('p');
p.innerHTML = item;
f.appendChild(p);
$('#folder_list').append(f);
document.getElementById(item).addEventListener('click', (e) => {
console.log(e.target.id);
let val = (subPath !== '')
? `${subPath}/${e.target.id}`
: e.target.id;
$('#folderNameDisplay').html(val);
$('#subPath').val(val);
$.post(
'/media-manager',
{
cmd: 'showDir',
subPath: $('#subPath').val(),
},
(data) => {
console.log(data);
},
'json'
).done((data) => {
dirContents = data;
renderFolderContents();
}).fail(() => {
})
.always(() => {
});
e.preventDefault();
})
});
```
As shown above, the inside of the `folders.forEach` loop is almost exactly the same code as the code for the "back" button. We:
- create some elements, strap them together, and then strap them onto the web page
- create an event listener for clicking on the submit button which represents the folder
- do the AJAX call in that event listener, and prevent traditional form submission from occuring
Things will, once again, be very familiar when we loop the `files` array, below, but with a slight twist:
```js
files.forEach((item) => {
let f = document.createElement('form');
f.className = 'mm_icon_form';
let i = document.createElement('input');
i.className = 'mm_icon_image';
i.style.cursor = "pointer";
i.setAttribute('type', 'submit');
i.setAttribute('value', '');
let sub = ($('#subPath').val()) ? `${$('#subPath').val()}/` : '';
i.setAttribute('id', item);
```
Here comes the twist:
```js
let url = `/static/img/mm/${sub}${item}`;
i.style.backgroundImage = `url('${url}')`;
i.style.backgroundSize = 'cover';
```
Instead of an emoji of a folder icon, we're using the actual image itself as the CSS `background-image` attribute, represented in DOM as the `.style.backgroundImage` property; and setting the CSS `background-size` attribute to `cover` via the DOM attribute `.style.backgroundSize`. With very few differences, everything else is the same until you get to the click handler.
```js
f.appendChild(i);
let p = document.createElement('p');
p.innerHTML = item;
f.appendChild(p);
$('#folder_list').append(f);
```
The click hander starts the same, but...
```js
document.getElementById(item).addEventListener('click', (e) => {
console.log(e.target.id);
```
...then comes this part:
```js
navigator.clipboard.writeText(
``
);
$('#media_manager').fadeOut(150);
$('.copy_msg').fadeIn(1000).fadeOut(5000);
```
Above, we're copying a string to the user's clipboard. This is the same as if they had selected that text on a page and pressed Ctrl-C. We also fade out the media manager, fade in a message, and fade out that message again, slowly. (The message explains that they can now paste the Markdown code.)
```js
e.preventDefault();
})
});
}
```
We prevent the form from submitting the non-AJAX way, end the click handler, end the `files.forEach()`, and end the function.
Now we do our page setup. The following code runs as soon as the browser is ready to render the page:
```js
$(document).ready(async () => {
// Media manager always starts at the root folder
$('#folderNameDisplay').html('Root folder');
```
Above, we set an H3 above the folder viewer to say "Root folder" because that's where the media manager starts.
```js
// initialize jquery-uploadfile plugin
$("#fileuploader").uploadFile({
url: "/media-manager",
fileName: 'uploadedFile',
multiple: false,
dragDrop: false,
dynamicFormData: () => {
return { cmd: $('#cmd').val(), subPath: $('#subPath').val(), };
},
returnType: 'json',
onSuccess: (files,data,xhr,pd) => {
console.log(JSON.stringify(data));
$.post(
`/media-manager`,
{ cmd: 'showDir', subPath: $('#subPath').val() },
(data) => {
console.log(data);
},
'json'
).done((data) => {
dirContents = data;
renderFolderContents();
})
.fail(() => {
})
.always(() => {
});
},
});
```
The above code initializes the jQuery-uploadfile plugin. We use the `dynamicFormData` field to allow us to feed the AJAX call up-to-date data from our `subPath` field. The `$.post()` call in its `onSuccess` field should be familiar by now.
```js
// setup create folder button
document.getElementById('create_folder')
.addEventListener('submit', (e) => {
```
Now we're going to add an event listener for the `submit` event on the `create_folder` form.
```js
let newFolder = $('#new_folder_name').val();
```
We grab the value of the text input box where the user types the name of the folder they want to create.
```js
if (
newFolder === ''
|| newFolder.indexOf('/') > -1
|| newFolder.indexOf('\\') > -1
) return false;
```
We do some basic security: no slashes allowed.
```js
$.post(
`/media-manager`,
{
cmd: 'mkDir', subPath: $('#subPath').val(),
newFolder: newFolder,
},
(data) => {
console.log(data);
},
'json'
).done((data) => {
console.log(data);
$.post(
`/media-manager`,
{ cmd: 'showDir', subPath: $('#subPath').val() },
(data) => {
console.log(data);
},
'json'
).done((data) => {
dirContents = data;
renderFolderContents();
})
```
First we send the `mkDir` value in the `cmd` field of the POST request, along with the `subPath` and `newFolder` fields. Then, when that request reports done, we refresh the folder view.
```js
.fail(() => {
})
.always(() => {
});
})
.fail(() => {
})
.always(() => {
});
```
As before, the above are just blanks you can fill out if you want to.
```js
e.preventDefault();
```
Prevent the form from submitting the non-AJAX way.
```js
});
```
Close out the click handler.
Next we populate the media manager with a view of the root folder (that is, the folder it's configured to treat as its `basePath`). It's the same as the other "get data/render the folder list" chains.
```js
// get initial folder data
$.post(
`/media-manager`,
{ cmd: 'showDir', subPath: $('#subPath').val() },
(data) => {
console.log(data);
},
'json'
).done((data) => {
dirContents = data;
renderFolderContents();
})
.fail(() => {
})
.always(() => {
});
```
Next we set up the close and open buttons to do their things:
```js
$('#close_x').click(() => {
$('#media_manager').fadeOut(150);
});
$('.open_mm').click(() => {
$('#media_manager').fadeIn(150);
});
```
And we're done with the script that runs when the page is ready for display!
```js
});
```
### Reminders
Do not expose this to random users. It's not secure enough. I wrote this in a morning from scratch. Make sure you only allow competent admins to use this! But with that said, I think it's attractive, fast, and gets the job done.


